Categories
Code Shopp WordPress Work

Sorting the country select in Shopp

This came up recently while working on a site that had a bunch of target markets selected in Shopp. The country dropdown list on the Checkout page was in a somewhat random order, and I realized that it was displaying them in the order they were selected or saved. When I checked 3 new countries, they showed up at the bottom of the list. So, knowing that, we decided it would be better for everyone if we sorted the list alphabetically. The code is below:

/* Sort Countries in dropdown alphabetically */
add_filter( 'shopp_countries', 'my_country_sort' );
function my_country_sort( $_ ) {

	$countries = array_msort($_, array( 'name' => SORT_ASC ) );
	// Ã…land Islands (EUR) sits at the bottom, so move it to the top
	$countries = array('AX' => $countries['AX']) + $countries;
	return $countries;

}

You’ll note the comment about Ã…land Islands; ideally we want it to be listed with the other A countries, but I don’t know if there’s a way to sort special characters as their originating character in PHP. So, we pop it off the end of the array and push it back to the top.

Categories
Code Shopp Web Work

Adding a date picker to Shopp

Every once in a while I get asked to add a date picker to the checkout page of a Shopp e-commerce site, usually to allow the customer to choose a delivery date for the order. There are a ton of date picker scripts out there, including a jQuery UI Datepicker (which I find ugly and difficult to reskin without adding a lot of extra bulk to your site), so I’m not going to list them all here. For my purposes, I use pickadate.js because it is lightweight, uses jQuery (which Shopp also uses), and looks great out of the box.

The first thing you’ll need to do is enable theme templates, if you haven’t already done so. Once that’s done, open your checkout.php file and add the following wherever you want your date picker field to be:

<label for="delivery-date">Delivery Date</label>
<?php 
shopp('checkout.order-data', array(
	'name' => 'Delivery Date',
	'type' => 'text',
	'id' => 'datepicker')
);
?>

This creates the input field you’re going to attach the date picker to, and gives it an id of “datepicker”. Next you’ll need to download the pickadate.js package and drop the .js and .css files into your theme folder. Then edit your theme’s functions.php file by adding the following:

add_action( 'wp_enqueue_scripts', 'pickadate_scripts' );
function pickadate_scripts() {
	// only load the date picker on the checkout page
	if ( is_shopp_checkout() ) {
		wp_enqueue_script( 'picker', get_stylesheet_directory_uri() . '/js/picker.js', 'jquery' );
		wp_enqueue_script( 'picker-date', get_stylesheet_directory_uri() . '/js/picker.date.js', array( 'jquery', 'picker' ) );
		wp_enqueue_style( 'picker', get_stylesheet_directory_uri() . '/css/picker-default.css' );
		wp_enqueue_style( 'picker-date', get_stylesheet_directory_uri() . '/css/picker-default.date.css' );
	}
}

Note the paths I’ve used; I usually put all of my theme’s CSS and JS files into separate folders so you may need to change your paths if you put them elsewhere. Now that the pickadate.js files are queued to show up on the checkout page, you need to attach the date picker to the field you added to the checkout page. This should also go in your functions.php file:

// Date picker for checkout pages
add_action( 'wp_head', 'pickadate_inline' );
function pickadate_inline () {
	if ( is_shopp_checkout() ) {
	echo "
	<script>
		jQuery(document).ready(function($) {
			$('#datepicker').pickadate();
		});
	</script>";
	}
}

It’s really that simple. If you need to modify the date picker behavior, take a look at the date picker documentation.

Categories
Code Shopp Web

Filtering Free Shipping Discounts in Shopp

When most people think of Hawaii, they picture palm trees, sandy beaches, mai tais, and sunsets, or sitting under a palm tree, drinking mai tais on the beach while watching the sunset. I have to admit that living in Hawaii is pretty great, but one of the things that most people don’t think about is that there is no such thing as cheap shipping to Hawaii.

We’ve all see Free Shipping promotions online, and if you’re lucky enough to live in the 48 contiguous states you probably don’t even think twice about it. But if you read the fine print, you’ll find that Hawaii and Alaska are almost always excluded. Even Amazon Prime, with it’s “Free Two Day Shipping” is actually “Free Standard Shipping (4-5 Business Days)” for Hawaii. Not that I’m complaining; I’ll take that over freezing winters and tornadoes any day.

But I digress. Let’s get to the code.

If you happen to be running a Shopp store, and you’re offering a Free Shipping for orders over $X promotion, you’ll likely want to make sure it doesn’t apply to customers in Alaska and Hawaii. The Discounts editor doesn’t currently support this, and the best you can do is set it up to only include US orders. See the setup below:
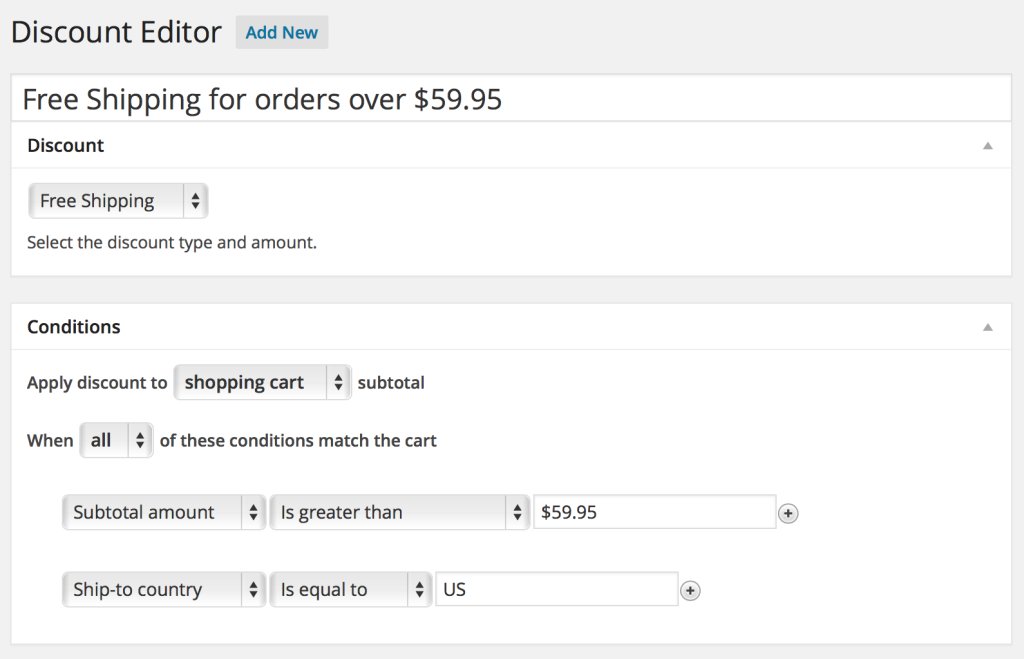
Free Shipping Discount Settings

Now, in order to exclude AK and HI, we’ll need to use an undocumented filter in Shopp called shopp_apply_discount, which runs once per active discount when the cart and order totals are being calculated. The filter passes two values: $apply which is a boolean for whether or not to apply the discount to the order, and $Promo which stores the contents of the ShoppPromotion object (which includes the type of discount, discount rules, etc). It expects a return value of true if the discount should be applied, or false if not.

Next we need to know the ID of the free shipping discount, so we know which one to exclude. The easiest way to find this out is to look at the link on the Discount editor page. For the sake of simplicity, we’ll say it’s 1.

There are two ways to go about excluding the discount from the cart. Either we could allow it to apply to the cart by default, then remove the discount after the customer has chosen their shipping state (or entered their zip code in the Estimated Shipping portion of the Cart). Otherwise, we could choose to only apply the discount after the customer has chosen their shipping state. For this example I’m leaving the discount disabled until after the customer chooses their shipping state, but you’ll have to decide which method works best for your site.

Drop the following code into your theme’s functions.php file:

// Filter the discounts and do not apply FREE SHIPPING until the shipping state is chosen
add_filter('shopp_apply_discount', 'no_free_shipping_for_you', 10, 2);
function no_free_shipping_for_you ($apply, $Promo) {

// set the ID of the Free Shipping promo
$shipping_promo = 1;
if ($Promo->id == $shipping_promo) {
    $Shipping = ShoppOrder()->Shipping;
    $Billing = ShoppOrder()->Billing;

    // Use the shipping state, with the billing state as a fallback
    $state = isset( $Shipping->state ) ? $Shipping->state : $Billing->state;
    shopp_debug("Free Shipping Promo match: State is '$state'");
    if ( empty($state) || $state == "AK" || $state == "HI" ) return false;
}

return $apply;
}

That’ll do it. If you wanted to have the discount apply all the time, except after a customer has chosen AK or HI, then you’d change the last if statement to this:

    if ( $state == "AK" || $state == "HI" ) return false;

One thing to consider is that if a customer doesn’t have an account on your site, you probably won’t know their shipping state until the Checkout page, except if the customer enters their post code in the Estimate Shipping & Taxes field in the Cart. Since this code may change their order total (either by removing or adding the free shipping discount during Checkout) they’ll see the difference on the Confirm Order page. It’s not ideal, but it’s the best we can do in this case.

I should note, this code will only work in Shopp 1.3.x. I’m not sure the filter existed before that, and the ShoppOrder() function definitely isn’t in 1.2.x.

Categories
Code Shopp WordPress Work

Disabling Multiple Clicks to the Submit Order button in Shopp

Most of us who use web browsers understand that the web UI only requires a single click on links, form buttons, and input fields. However, there are people who are used to double-clicking everything in the same way you double-click icons in an OS GUI. Sometimes this causes problems, specifically with shopping carts, where double-clicking can lead to the checkout form being submitted twice which results in duplicate orders.

I ran into this problem with Shopp, in a very specific situation where the server was responding slowly. Normally this kind of thing doesn’t happen, and I couldn’t reproduce the problem myself, but a few customers over a couple of days had managed to place duplicate orders. After checking the database I noticed that the transactions were usually 2-15 seconds apart, so I thought I’d disable the “Submit Order” button on the checkout form after it had been clicked once. Easier said than done.

Unfortunately, this isn’t as simple as using the disabled attribute on the button. Since there is some Javascript input validation, I needed to make sure that the form was validating first before disabling the button. Fortunately, I had spoken to the lead developer of Shopp about this a while back, so I knew that I needed to check `shopp.validate` which fires when the Submit Order button is clicked. If it validates correctly, then it submits the form data to the server. After some digging in the JS, I found the validation method and wrote some code to disable it after the button has been clicked once. Here’s the code:

<script type="text/javascript">// <![CDATA[
jQuery(document).ready(function($){
	var form = $("#checkout.shopp"),
		checkoutButton = $('.payoption-0 input');

	form.on("submit.validate", function(e) {
		if ( validate(this) ) {
			form.unbind('shopp_validate');
			checkoutButton.unbind("submit.validate").attr("disabled", "disabled").attr("value", "Processing...");
			// set a timer to re-enable the button or maybe reload the page
			setTimeout(timeouterr, 30000);
		}
	});

	function timeouterr() {
		$('.payoption-0').append('An error has occurred, and your order has not been sent in 30 seconds. Please <a href="javascript:location.reload();">reload the page</a> and try your transaction again.');
	}
});
// ]]></script>

All you have to do is drop this code into the bottom of the checkout.php file in your theme/shopp directory.

The code runs when the “Submit Order” button is clicked, and it checks to make sure the form is valid. If it is, it disables the validate function, which posts the data to the server, and then it changes the button text to “Processing…” so the customer knows something is happening. In the event that something doesn’t happen after 30 seconds, the `setTimeout()` function will display a message below the button that says the order hasn’t gone through, and shows a link to reload the page.

This code has stopped the duplicate transaction issue I was seeing, and it offers a better user experience especially on slow sites where a customer might click on the submit button because it doesn’t look like anything is happening.

Categories
Code Web WordPress

Changing the default WordPress email sender

It’s not uncommon to want to change the email sender that WordPress sets automatically, especially in e-commerce situations. It’s actually really easy to do by adding a couple of filters in your theme’s functions.php file:

/** change the default WordPress email sender */
add_filter('wp_mail_from', 'my_mail_from');
add_filter('wp_mail_from_name', 'my_mail_from_name');

function my_mail_from($email) {
return 'customerservice@example.com';
}
function my_mail_from_name($name) {
return 'Customer Service';
}

Categories
Code Web WordPress Work

Filtering excerpts in WordPress

By default WordPress displays […] at the end of an excerpt, which doesn’t look good. Instead, I use this functions on blogs that I build, which changes it to something that looks better. Just add the following to your active theme’s functions.php:

function new_excerpt_more( $more ) {
return '... <a class="moretag" href="'. get_permalink($post-&gt;ID) . '"> Read More »</a>';
}
add_filter('excerpt_more', 'new_excerpt_more');