Categories
Web

How do you get more traffic to your web site?

First things first, I should preface this by saying that I've been working as a Theme Wrangler for Automattic, Inc. on WordPress.com since June 12, 2017. To say "It's a pretty sweet gig" is putting it lightly. You should seriously consider working with us.

One part of my job is to post articles on our company blog in order to better empathize with our customers. Blogging isn't easy, and doing it regularly is hard. I know this because it's something I've struggled with for years (as evidenced by the very sparse archives on this site). Even if you post regularly, there's no guarantee that you'll actually get traffic, which is usually the point of having a web site.

The Problem

This year, I'm challenging myself to start a photo blog, and sell some of my photos using WooCommerce. I've been taking a lot of photos over the years, and I'd like to have a place where they can be viewed as a collection.

Find Your Audience

My biggest problem with writing a blog has always been a question of audience. Who am I writing for? What should I write about? When I was working with Shopp, I decided to write articles to help people learn how to use the plugin. Even then, knowing who my audience was, it wasn't easy to find things to write about.

So I'm going to cheat here a little bit, because I won't actually be writing; I'll be posting photos. I'm not really sure who my audience is aside from my friends, family, and the people who I'm friends with on Facebook. I tend to shoot landscapes, so my audience should be people who enjoy landscape and starscape photos of Hawaii (and elsewhere).

Spreading the Word

With my audience in mind, I'm going to start small and promote my photo blog via these 3 channels:

Facebook – I've already been posting my photos here for years, but it's mixed in with my personal content. I'm going to create a page for my photography, but I worry that I'll have a smaller audience with less engagement than I would posting as myself.

Instagram – Lately I've been posting my photos to Instagram first, and then have the app automatically post the photo to Facebook. This makes for a much easier workflow, but it might be harder to drive traffic to my web site from this place.

Local Events – There are a handful of local events that I volunteer to shoot photos for; mostly running and outrigger canoe races. If I can get myself listed as a sponsor, or get my site linked on the event web sites, that may help drive some traffic my way. I've also donated photos to silent auctions, but haven't included any promotional material with it. I think this would net less overall traffic, but possibly more conversions.

Setting Goals

Getting eyes on my photos is great, but ideally I'd like to get my pictures on people's walls. There's nothing quite like seeing your work printed out and hanging on a wall. With that in mind, I'm setting two conversion goals for the people who visit my site:

  1. Buy Prints – This is the primary goal, but is likely to be a much smaller percentage of site visitors.
  2. Sign up for my email list – The secondary goal is to get people to sign up for a monthly (or quarterly) email of my recent shots, and occasionally offer coupons for the online store.

Checking Results

I'm interested to see how each of my marketing channels perform, and plan to keep an eye on incoming traffic referrals from each source. I think if I had to spend money, I would try purchasing ads on Facebook first just to help build the site's audience. I'm also curious about what percentage of visitors convert to paying customers, or sign up for the email list.

Overall, it should be a good experiment. I suspect the most difficult part won't be getting visitors, but actually posting on a regular basis. As our creed states: "I am in a marathon, not a sprint, and no matter how far away the goal is, the only way to get there is by putting one foot in front of another every day." It's time to take that first step.

This post was written in Gutenberg.

Categories
Code Shopp Web Work

Adding a date picker to Shopp

Every once in a while I get asked to add a date picker to the checkout page of a Shopp e-commerce site, usually to allow the customer to choose a delivery date for the order. There are a ton of date picker scripts out there, including a jQuery UI Datepicker (which I find ugly and difficult to reskin without adding a lot of extra bulk to your site), so I’m not going to list them all here. For my purposes, I use pickadate.js because it is lightweight, uses jQuery (which Shopp also uses), and looks great out of the box.

The first thing you’ll need to do is enable theme templates, if you haven’t already done so. Once that’s done, open your checkout.php file and add the following wherever you want your date picker field to be:

<label for="delivery-date">Delivery Date</label>
<?php 
shopp('checkout.order-data', array(
	'name' => 'Delivery Date',
	'type' => 'text',
	'id' => 'datepicker')
);
?>

This creates the input field you’re going to attach the date picker to, and gives it an id of “datepicker”. Next you’ll need to download the pickadate.js package and drop the .js and .css files into your theme folder. Then edit your theme’s functions.php file by adding the following:

add_action( 'wp_enqueue_scripts', 'pickadate_scripts' );
function pickadate_scripts() {
	// only load the date picker on the checkout page
	if ( is_shopp_checkout() ) {
		wp_enqueue_script( 'picker', get_stylesheet_directory_uri() . '/js/picker.js', 'jquery' );
		wp_enqueue_script( 'picker-date', get_stylesheet_directory_uri() . '/js/picker.date.js', array( 'jquery', 'picker' ) );
		wp_enqueue_style( 'picker', get_stylesheet_directory_uri() . '/css/picker-default.css' );
		wp_enqueue_style( 'picker-date', get_stylesheet_directory_uri() . '/css/picker-default.date.css' );
	}
}

Note the paths I’ve used; I usually put all of my theme’s CSS and JS files into separate folders so you may need to change your paths if you put them elsewhere. Now that the pickadate.js files are queued to show up on the checkout page, you need to attach the date picker to the field you added to the checkout page. This should also go in your functions.php file:

// Date picker for checkout pages
add_action( 'wp_head', 'pickadate_inline' );
function pickadate_inline () {
	if ( is_shopp_checkout() ) {
	echo "
	<script>
		jQuery(document).ready(function($) {
			$('#datepicker').pickadate();
		});
	</script>";
	}
}

It’s really that simple. If you need to modify the date picker behavior, take a look at the date picker documentation.

Categories
Code Shopp Web

Filtering Free Shipping Discounts in Shopp

When most people think of Hawaii, they picture palm trees, sandy beaches, mai tais, and sunsets, or sitting under a palm tree, drinking mai tais on the beach while watching the sunset. I have to admit that living in Hawaii is pretty great, but one of the things that most people don’t think about is that there is no such thing as cheap shipping to Hawaii.

We’ve all see Free Shipping promotions online, and if you’re lucky enough to live in the 48 contiguous states you probably don’t even think twice about it. But if you read the fine print, you’ll find that Hawaii and Alaska are almost always excluded. Even Amazon Prime, with it’s “Free Two Day Shipping” is actually “Free Standard Shipping (4-5 Business Days)” for Hawaii. Not that I’m complaining; I’ll take that over freezing winters and tornadoes any day.

But I digress. Let’s get to the code.

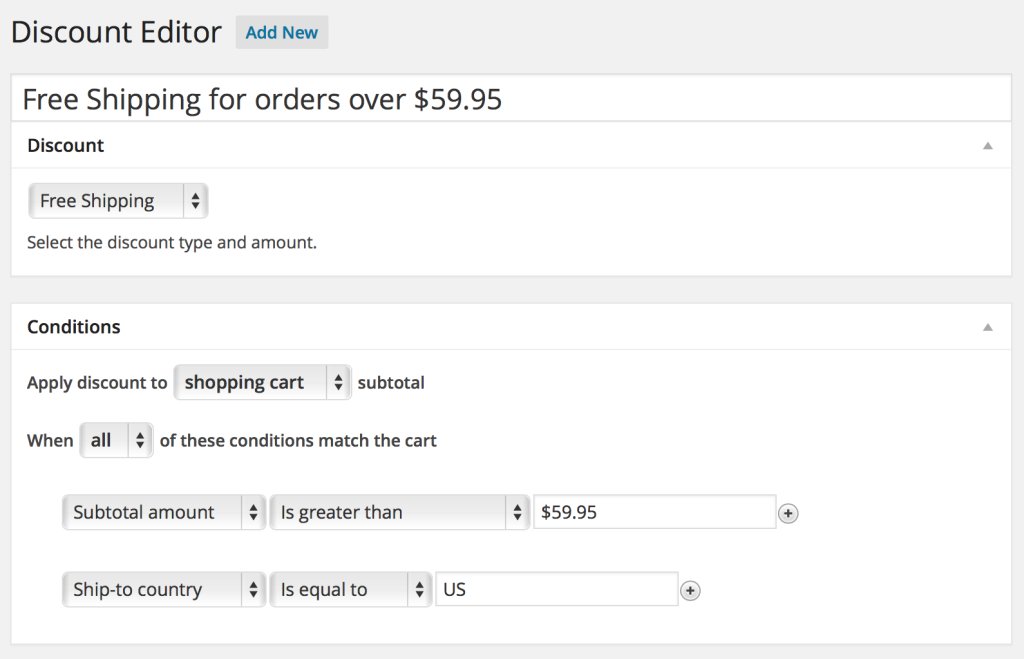
If you happen to be running a Shopp store, and you’re offering a Free Shipping for orders over $X promotion, you’ll likely want to make sure it doesn’t apply to customers in Alaska and Hawaii. The Discounts editor doesn’t currently support this, and the best you can do is set it up to only include US orders. See the setup below:

Free Shipping Discount Settings

Now, in order to exclude AK and HI, we’ll need to use an undocumented filter in Shopp called shopp_apply_discount, which runs once per active discount when the cart and order totals are being calculated. The filter passes two values: $apply which is a boolean for whether or not to apply the discount to the order, and $Promo which stores the contents of the ShoppPromotion object (which includes the type of discount, discount rules, etc). It expects a return value of true if the discount should be applied, or false if not.

Next we need to know the ID of the free shipping discount, so we know which one to exclude. The easiest way to find this out is to look at the link on the Discount editor page. For the sake of simplicity, we’ll say it’s 1.

There are two ways to go about excluding the discount from the cart. Either we could allow it to apply to the cart by default, then remove the discount after the customer has chosen their shipping state (or entered their zip code in the Estimated Shipping portion of the Cart). Otherwise, we could choose to only apply the discount after the customer has chosen their shipping state. For this example I’m leaving the discount disabled until after the customer chooses their shipping state, but you’ll have to decide which method works best for your site.

Drop the following code into your theme’s functions.php file:

// Filter the discounts and do not apply FREE SHIPPING until the shipping state is chosen
add_filter('shopp_apply_discount', 'no_free_shipping_for_you', 10, 2);
function no_free_shipping_for_you ($apply, $Promo) {

// set the ID of the Free Shipping promo
$shipping_promo = 1;
if ($Promo->id == $shipping_promo) {
    $Shipping = ShoppOrder()->Shipping;
    $Billing = ShoppOrder()->Billing;

    // Use the shipping state, with the billing state as a fallback
    $state = isset( $Shipping->state ) ? $Shipping->state : $Billing->state;
    shopp_debug("Free Shipping Promo match: State is '$state'");
    if ( empty($state) || $state == "AK" || $state == "HI" ) return false;
}

return $apply;
}

That’ll do it. If you wanted to have the discount apply all the time, except after a customer has chosen AK or HI, then you’d change the last if statement to this:

    if ( $state == "AK" || $state == "HI" ) return false;

One thing to consider is that if a customer doesn’t have an account on your site, you probably won’t know their shipping state until the Checkout page, except if the customer enters their post code in the Estimate Shipping & Taxes field in the Cart. Since this code may change their order total (either by removing or adding the free shipping discount during Checkout) they’ll see the difference on the Confirm Order page. It’s not ideal, but it’s the best we can do in this case.

I should note, this code will only work in Shopp 1.3.x. I’m not sure the filter existed before that, and the ShoppOrder() function definitely isn’t in 1.2.x.

Categories
Web WordPress

WP-Property is great

This week I’ve been working on a new website for Lava Rock Realty to promote their property management services by showing their vacation rentals on their site. My first instinct was to use custom post types to create something custom that would do exactly what we needed. I figured it wouldn’t take very long and would be better than evaluating a bunch of 3rd party plugins to find one that did everything my clients needed.

Fortunately, as I was writing the code to setup the custom post type, I thought I’d do a quick Google search to see what was out there for showing listings and properties. Other WP devs must have written something, right?

One of the first plugins I found was WP-Property, and it looked like it would do everything I needed. After installing it and spending a few minutes playing with it and familiarizing myself with how it works, I knew I didn’t need to look any further. This plugin is great for showing listings, and has some premium addons that may be useful in other projects (I’m looking at you MLS/RETS/XML importer).

That said, there are some tweaks that need to be made to the base templates, which I’ll cover in an article later. Otherwise, this plugin is great!

Categories
Web Work

Email Marketing Win

I just wrapped up online registration for the Mac-A-Thon which is a fundraising race for Keoua Canoe Club. This race has been going on for the past 32 years, and is one of the oldest 5k/10k runs on the island.

Three years ago when I joined the canoe club I volunteered to help with the web site. This eventually extended to helping with registration and marketing of the Mac-A-Thon. In 2011 I designed a new flyer, re-did the registration forms to include a line for an email address, and in 2012 I setup online race registration. That year, I imported all of the email addresses from our 2011 registration forms and sent out an email notice about the online registration option. We pre-registered about half of the runners online in 2012, which I took as a great step forward.

This year, I started our email marketing campaign earlier and sent more emails letting people know about our pre-registration savings deadlines. The result was a 100% increase in online registrations in 2013, which in turn makes this year one of the biggest Mac-A-Thon’s we’ve had in years.

All this with no budget, in my free time. Winning!

A huge shout out to MailChimp for making it possible.

Categories
Code Web WordPress

Changing the default WordPress email sender

It’s not uncommon to want to change the email sender that WordPress sets automatically, especially in e-commerce situations. It’s actually really easy to do by adding a couple of filters in your theme’s functions.php file:

/** change the default WordPress email sender */
add_filter('wp_mail_from', 'my_mail_from');
add_filter('wp_mail_from_name', 'my_mail_from_name');

function my_mail_from($email) {
return 'customerservice@example.com';
}
function my_mail_from_name($name) {
return 'Customer Service';
}